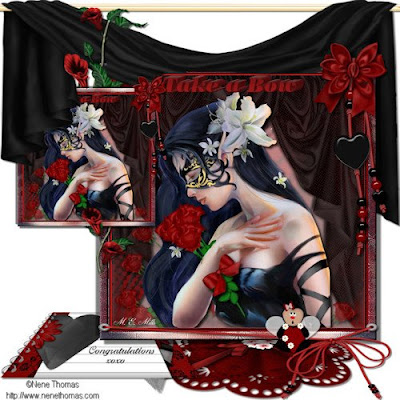
Hi All
Hi all well here is my new tutorial
This tutorial assumes you have a working knowledge of Paint shop Pro.
The results of this tutorial were done in Paint shop Pro Ultimate x2.
Hugs Michelle
Supplies
A Tube of choice I have used the artwork of Nene Thomas
I have also used a FTU scrap kit called black and red which you can get here
http://www.azyzam.nl/scrapbook/scrapbook.htm
Mask which you can get from here
Created by Jutta
And Font of choice I used Poster
Plug-in eye candy impact extrude (optional)
VM distortion > kaleidoscope
Ok this is an easy Tutorial but has a couple of steps
Open your tube and your mask
First let’s create a new transparent 600x600 image
Create a new raster and then select all
Open paper 9 and paste into selection change opacity to 50%
Add a new raster and select all
Now open paper 16 and copy and paste into selection
Now go to Layers>new mask>from image
Select mask from drop down menu and source luminance checked only
Merge group and then duplicate your layer and merge down
Duplicate layer again and merge down
Add a drop shadow I used default values
Copy and paste your Tube as a new layer and add a drop shadow
I used V&H 5 opacity 60 and blur 5
Open Red rose and copy and paste as new layer then resize to 50%
Free rotate image 35 degrees and then duplicate layer three times
Move each layer a little until you have a bunch of roses
See my image for approximate layout
Merge the rose layers and move into the crook of arm
Erase part of the stems to look like she is holding the roses
Open bow 10 copy and paste as new layer and resize 30%
Free rotate to 35 degrees and place on stems of roses
Copy and paste red rose again and this time resize to about 40%
Now scatter them about when you have enough and how you want
Merge layers and change opacity to about 65%
Add your text and if using plug-in use extrude with the following settings
Under basic settings use extrude direction 18, distance 20, taper 0, smoothness 50, solid colour and colour of choice, light direction 129, highlight brightness 50, highlight colour white, shadowing 50
Save now
Part two
Add a frame however you like... I used the following settings
Add borders 3px and red add inner bevel 2, w 3, s 40, d 5, a 0, s 20, c white, a 315, i 40, e 30
Repeat with black and then red again
Add borders px 20 black use magic wand to select border and then use VM distortion plug-in
Kaleidoscope and find just play until you find a setting you like
Add an inner bevel with the following settings
Bevel 1, w 2, s 10, d 6, a 30, s 0, c white, a 315, i 40, e 33
Save work
Part three
Promote background layer and increase canvas size to 950
Decoration time...
Duplicate layer and resize to 50%
Move you where you’d like it I moved mine to upper left
Add a drop shadow to your first image I used default and then did it again this time
Using V&H -10
Add drop shadow to your second image this time half of default values and repeat
With your V&H -5
Find which ever decorations take your fancy
This is your tag ... Have fun...
If you wish to put items under your frame
Use your deform tool and perspective or use your control button on your keyboard and left mouse button to manipulate image push the top area together
The doing the same thing pull the bottom area out and it will flatten an image for you
Well have fun don’t forget to add any copyright information when done and your watermark
Resize your image and if necessary sharpen once
Save your work you’re done
Hugs Michelle


2 comments:
Thank you! Your blog post will be advertised on the DigiFree Digital Scrapbooking Freebie search engine today (look for timestamp: 12 Feb [LA 07:00pm, NY 10:00pm] - 13 Feb [UK 03:00am, OZ 02:00pm] ).
Thank you so much for this Freebie. I want to let you know that I posted a link to your blog in Creative Busy Hands Scrapbook Freebies Search List, under the Elements Only, Papers Only post on Feb. 13, 2009. Thanks again.
Post a Comment