Well here is the promised tutorial for Autumn Guardian, took little while for this one cause I managed to freeze my computer..
Please never ever forget to save.. I am bad for not saving as going along... lucky I have autosaves but still you always doubt..
Anyway here is the tutorial hope you have fun trying it and would love to see the results
Just small reminder of what I've said
The tag is called Autumn Guardian.
I am again using a scrapkit by Stacey that is a FTU kit and that can be found here www.snmcreationz.blogspot.com/ This scrapkit is just one part of Sweet -N- Sassy www.sweetnsassydigiscrappers.com/store/ Fall Blog Train so if you go to the link not only will you find other links for the blog train and the kit used in these tags but also other great scrapkits by Stacey.
Also in this Tag I used the beautiful artwork of Annika Smidt www.apfelkeks.de/
The template used was from dezigns by Ali www.designsbyali.blogspot.com/
Please note I try to give credit where credit is due many graphics and tubes I recieve through groups and if I have failed to credit please let me know and I will do so or if you wish remove the item.
Thanks Hugs Michelle
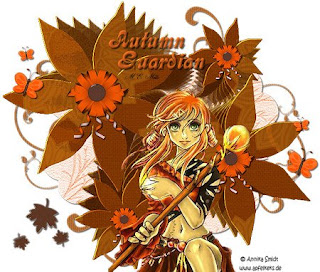
AUTUMN GUARDIAN
This tutorial was written by Michelle Mills on 31st October 2008. Any resemblance to any other tutorial is purely coincidental. I claim all rights to this tutorial. Your results of this tutorial you are free to do with as you wish. This tutorial assumes you have a working knowledge of Paint shop Pro. The results of this tutorial were done in Paint shop Pro Ultimate x2.
Hugs Michelle
So we want to open our template duplicate and close the original. Open your scrap kit and also your Tube.
Delete the copyright layer of your template.
We’re going to work from the template so select your doodle layer and then selection> select all> float then open paper 3 copy then paste as new layer. Selection > invert and then delete. Select none and add a drop shadow of choice.
I used V&H 2, Opacity 60, Blur 2 colour Black. Go to doodle layer and delete. Raster 1 is now your new doodle layer can rename as such.
Go to shape layer and opening paper 6 do everything as previous instructions.
When done delete the shape layer and rename your raster layer shape if you like.
Go to Flower Shapes layer and select all>float>defloat and choose paper 5 do as before but stop after deselecting. Now we use plug-in MuRa meister> copies select our new flower shapes open your plug-in and use the following settings. Choose from your dropdown lists Feedback (Centre), Line, tile mode and behind
Your BG colour is white, Number 10, Shift x 4, shift y -16, angle 0,rotation 10, phase 0, cycle 0, attenuation 60, scale 20, tile gap 0, thru BG range 5, thru BG smooth 30, fade out 100, fade out to BG unchecked
Now go back to our flower shape template layer and select >float> defloat and open paper 2 copy and paste as new layer select>invert and then delete move this layer above our flower shape layer and use blend mode screen. Deselect and then delete the template flower shape layer.
Also delete template Circles as won’t be using them.
So now we have our doodle layer, shape layer, flower shape using plug-in and flower shape with blend mode screen. Can merge visible at this time
Open ribbon and bow element from your kit and we will copy and paste as new layer and then resize to 10% make sure resize all layers is unchecked. Adjust > sharpness> sharpen only once. Move this to the middle of the bottom left flower shape. Duplicate your layer and move the duplicate flower to the middle of the top right flower shape.
Now copy and paste as new layer again this time resize your image to 15% adjust sharpness once and move this image to the middle of top left flower shape and finally duplicate this layer and move the duplicate the middle of the bottom right flower shape. See my image for placement.
Close off your merged background so that just your ribbons a showing merge visible and then add a drop shadow. I use the same drop shadow throughout this tutorial.
Reopen your merged background. Now open your Tube and copy and paste as new layer and move it to where you think will look best then add any other elements you like... I used some butterflies and leaves just resizing and placing where I think they looked best. It’s your tag have fun.
When finished merge visible and resize don’t forget to adjust and sharpen just once, add your watermark and any text you like save your tag you’re done
Now don’t forget to save often during this unlike me...lol...better late than never for that warning...PSP froze on me whilst in the middle of re-trying my tutorial as I was writing it and I couldn’t get it to unfreeze and I’m just lucky I had auto save on everything...which allowed me to continue when I restarted my computer..Yea!!!! ..But I doubted for a minute there...SO MY ADVISE SAVE OFTEN!!!!!








No comments:
Post a Comment