Hi all
Well today it's two tutorials. Both nice and simple
I hope you enjoy my tutorials and of course continue to visit my blog.
Well I was playing on psp tonight and came up with something nice but very easy
So here's my new tutorial.
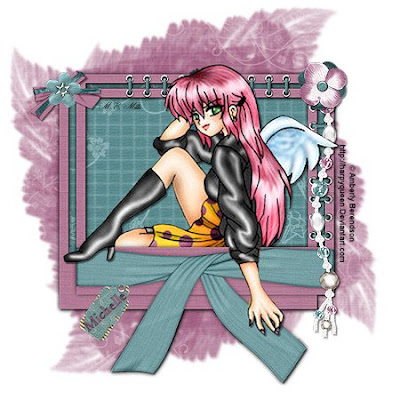
Angel Girl
I was playing around tonight and here is what I came up with. It’s a very simple tag using beautiful artwork from Amberly Berendson http://harpyqueen.deviantart.com/ and a beautiful FTU scrap kit by Sophisticated scraps http://techgroups.yahoo.com/group/sophisticatedscraps
I was playing around tonight and here is what I came up with. It’s a very simple tag using beautiful artwork from Amberly Berendson http://harpyqueen.deviantart.com/ and a beautiful FTU scrap kit by Sophisticated scraps http://techgroups.yahoo.com/group/sophisticatedscraps
This tutorial was written by Michelle Mills on 12th November 2008. Any resemblance to any other tutorial is purely coincidental. I claim all rights to this tutorial. Your results of this tutorial you are free to do with as you wish. Please respect the TOU of the owner of the scrap kit. This tutorial assumes you have a working knowledge of Paint shop Pro.
The results of this tutorial were done in Paint shop Pro Ultimate x2.
Supplies
Mask nik_fraxmask3
Scrap kit Natural Harmony FTU
Tube of choice
Font of choice I used Akline401 BT
I have provided some of the supplies as per TOU which you can get from here http://www.mediafire.com/?sharekey=9a3332bb218e0ec0ab1eab3e9fa335ca2ab70dc6ea0e328b
Open all your supplies that you need
Open a new 600x600 transparent image then select all and copy and paste into selection paper 7
Go to layer>new mask> from image and from drop down list select mask source luminance and invert mask data unchecked.
Go to layer>new mask> from image and from drop down list select mask source luminance and invert mask data unchecked.
Merge group and add Drop shadow V & H 2, Opacity 60 and blur 2, colour from your paper #a05f81
Open your frame and resize to 65%, adjust sharpness once and then copy and paste as new layer.
Open your frame and resize to 65%, adjust sharpness once and then copy and paste as new layer.
Add a drop shadow I used V&H 2, opacity 60, and blur 2, colour Black
Move the frame down a little so placement is more in middle of masked area. See my image for placement
Use magic wand with add, RGB Value, tolerance 0 and click inside the main frame area and all the little areas around it.
Move the frame down a little so placement is more in middle of masked area. See my image for placement
Use magic wand with add, RGB Value, tolerance 0 and click inside the main frame area and all the little areas around it.
Then selections >modify> expand by 8.
Copy and paste as new layer paper 6 and selections>invert and delete.
Deselect and move your new paper layer under the frame
Duplicate frame layer.
Duplicate frame layer.
Copy and paste your tube as new layer and move it down in between the two frame layers.
Go back to the top frame layer and erase parts of the frame to have parts of the tube image show over the frame, the girls arm her boot and her head. Also erase the small amount of skirt that shows at the bottom, see my image for where to erase the frame.
Now add your embellishments however you like. It’s your tag have some fun.
I resized my flowers one at 30 one at 20 my bow at 25 and my tag at 30 and beaded string at 50.
I sharpened all once and added a drop shadow to all.
Add some text to tag if you like or your name.
Add some text to tag if you like or your name.
Merge all and then resize sharpen once; add your watermark and any copyright information save your tag. You’re done
Well I hope you liked the tutorial. Thanks for trying
Hugs Michelle
Well I hope you liked the tutorial. Thanks for trying
Hugs Michelle










1 comment:
Michelle,
Very cute tutorial...I love it
Shari
Post a Comment