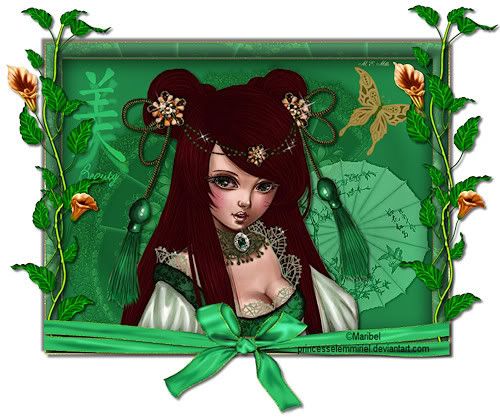
Oriental Beauty
Hi All... Created a new tutorial for you all to try... hope you all enjoy it
Hugs Michelle
This tutorial was written by Michelle Mills on 03 February 2009. Any resemblance to any other tutorial is purely coincidental. I claim all rights to this tutorial. Your results of this tutorial you are free to do with as you wish. Please respect the TOU of the owner of the scrap kit.
This tutorial assumes you have a working knowledge of Paint shop Pro.
The results of this tutorial were done in Paint shop Pro Ultimate x2.
Hugs Michelle
Supplies need three tubes of choice
I have provided some of the background supplies here
If necessary install the gold texture in your texture or pattern files
I have used the beautiful Artwork of Maribel which you can find here
©Maribel
www.princesselemmiriel.deviantart.com
I have also used a beautiful FTU kit by Leela of Blackwings Scraps called A Dream
Which you can get here http://blackwingscraps.blogspot.com/
Ok so here we go with the tutorial
Couple of steps involved but all very easy
First Create a new 600x450 transparent image
Choose two colours from your tube a light and a dark colour and
Flood fill with your dark background colour you have chosen from your main tube
Colours I have used #23864b for my foreground and #176534 for my background colour
Now go effect>texture effects>blinds and with the following settings
Width 2, opacity 70, colour your light colour and light from left to top checked
Copy and paste as new layer your fan and move to the left see image for placement
Change opacity to 50% and blend mode to soft light add a drop shadow
V -3, H 0, Opacity 70, blur 6, colour black
Now copy and paste as new layer your umbrella and move to bottom right
Opacity at 60% and blend mode luminance legacy
Drop shadow V 3, H 3, opacity 70, blur 6, colour black
Copy and paste as new layer your main tube and resize as necessary
Place where you think is best I placed ever so slightly off centre and added a drop shadow
V & H 5, Opacity 60, Blur 6 colour black
Copy and paste as new layer one of the symbols and place to the top left of image
I used beauty and then change opacity to 80% and blend mode to luminance
Image add borders of 2px with white
Use your magic wand to select the white border and fill with gold pattern select none
Image add borders of 25 px with white
Select border with magic wand and using your clone brush fill in the border
If you can’t get a pattern you like... I found it easier to open your fan tube and recreate the background like your tag and then add borders of 25 that and use the clone brush to create your frame border...then go back and add new raster to your tag image and copy and paste into selection do not deselect
See screen shots below
Add a new raster and flood fill with white and change the opacity to 20% merge down this layer and then merge down again do not deselect yet
Effect>inner bevel with the following settings
Bevel 1, width 8, depth 2, Ambience 0, shininess 10, colour white, angle 315, intensity 67, elevation 20
Select none
Add borders 2px with white and then select again with magic wand and fill with gold pattern
Promote background to raster
Image>canvas size width 820, height 750
Now using the scrapkit choose some elements to decorate your frame
I have used element 26 butterfly copy and pasted as new layer, resized to 40% and free rotated to 35 degrees to the right move to the right corner see image for placement
And then adjust manual colour correction and changed it to following settings
Right click on the top left image on the screen to get the main colour and then
Hue 18, sat 165, lightness 124 and change opacity to 60%
Element 14 and copy and pasted as new layer and then using deform stretched it go across the bottom of my frame see image
Manual colour correction using same technique as before and use the following settings
Hue 101, Sat 167, lightness 106
Add dropshadow of V&H 3, opacity 60, blur 5, colour black
Element 16 copy and paste as new layer and move layer underneath the ribbon layer
And then manual colour change and click your mouse on the flower in the top left image and use the following settings
Hue 19, sat 142, lightness 147
Add same dropshadow as before and duplicate image and move to the right of the image
See image for placement
Add a drop shadow to the frame if you like add your watermark and any copyright information
Merge visible and crop your image and resize to what you like
You are done...
Thank you for trying my tutorial I hope you have enjoyed it
And thanks for visiting
Hugs Michelle


1 comment:
Very pretty tag Michelle thanks for the tutorial too!
Gonna be following you for more neat stuff!
hugs,
Rhonda
Post a Comment